Source code for final project code can be found Here.
Unified Modeling Language (UML) is a powerful tool used by developers to visualize and design complex software systems. UML diagrams, including class diagrams, are essential to understanding the structure and relationships of classes within an application. Converting a UML class diagram into actual code can be a challenging task, especially for beginners. In this essay, we will explore the process of converting a UML class diagram into C# code, step-by-step.
We will cover the fundamental concepts of UML, explain how to interpret UML class diagrams, and provide a practical example to guide readers through the process of converting UML class diagrams into working C# code. By the end of this essay, you will have a solid understanding of how to convert UML class diagrams into C# code, and how to apply this knowledge to develop robust software applications.
Designing a Class Diagram
In this lesson, we’ll be developing a Permit Test Application that enables users to learn and tracks their progress by keeping a record of their correct answers. We’ll create a Class Diagram to efficiently transfer class information and structure into code.
Class Diagram Information
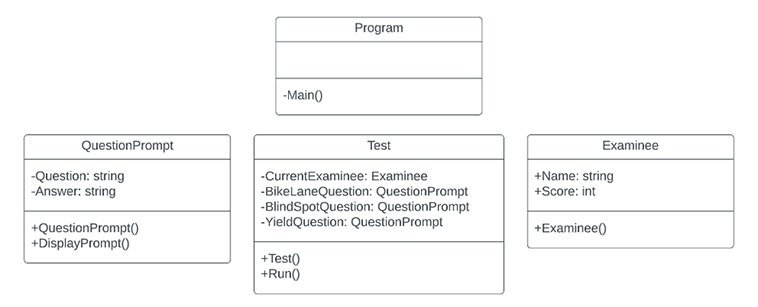
The Permit Test should consist of four classes: an Examinee class, a QuestionPrompt class, a Test class, and a Program class. The Examinee class will keep track of the user’s name and score. The QuestionPrompt class will be the blueprint that stores the question and answer of each prompt, and it will contain a method that displays the prompt to the user. The Test class will be the powerhouse of the program, containing most of the code that displays the Test to the user using a Run() method.
If you’re having a hard time keeping track of this explanation, look below at Figure 1a to visualize the program structure using a Class Diagram.

We’ll start by listing the most obvious elements that can be described:
- There are four different classes
- Three of the classes contain constructors
- Three of the classes contain attributes
- Two of the classes contain two methods
Learn more on UML structure here. With no prior knowledge on class diagrams, the Test class will look tricky. However, you will find out that it is extremely easy to convert to code.

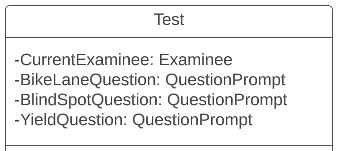
The class attributes are divided into two sections. Let’s take the first line, “CurrentExaminee,” as an example. The “-CurrentExaminee;” describes a private variable named “CurrentExaminee.” This variable can only be accessed within the class, and not from outside. The second part of the line specifies the data type of the variable. In this case, the data type is a class. This means that “CurrentExaminee” is an object of the “Examinee” class and will contain all the attributes and methods defined in the “Examinee” class blueprint.
The same concept applies to the next three variables, “BikeLaneQuestion,” “BlindSpotQuestion,” and “YieldQuestion.” They are all objects of the “QuestionPrompt” class, which is the blueprint for question prompts. This means that each of these variables will contain all the attributes and methods defined in the “QuestionPrompt” class blueprint.
If you’re wondering how to choose the access modifier for each attribute, a good tip is to classify them as private and then adjust as needed. For the Permit Test App, each attribute began as private, however, iterations were made as the structure and logic progressed.
As a result of this principle, the Name and Score attributes in the program now have public access, signified by the (+). This means that these attributes can be accessed and modified from outside the class, making them more versatile and easier to use in other parts of the program. Now that we’ve gone over the basic structure of the Class Diagram, let’s begin transferring it into a Visual Studio Console project titled PermitTestApp.
Visual Studio
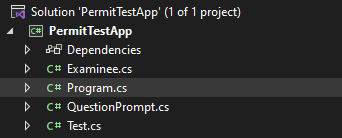
After you’ve created your Console project, you will be greeted by the Program.cs file that displays “Hello, World!” in your console. Using our Class Diagram, create 3 new classes with the same names as the diagram. Create new classes by Ctrl Clicking on the Solution Explorer Project>Add>New Item… or by clicking on Project>Add New Item… in the main toolbar.
Quick Tip: Create new classes quickly with the Ctrl+Shift+A shortcut.

We’ll start by filling out the required attributes and methods for all the classes. Visual Studio has already done you the favor of creating the Program.cs file with a Main() method.
internal class Program{
	static void Main(string[] args)
	{
		// Code that runs the permit test goes here
	}
}
Next, we’ll convert the Test class to code. We have 4 total attributes to create, in programming these attributes are also known as Fields.
The usual structure for clean code is Fields, Constructor, and then Methods. You can see in the code below, this clean code structure results in easy-to-read code.
internal class Test
    {
				// Fields
        private Examinee CurrentExaminee;
        private QuestionPrompt BikeLaneQuestion, BlindSpotQuestion, YieldQuestion;

				// Constructor
				public Test()
        {
					// Constructor code goes here
        }

				// Method
        public void Run()
        {
					// Code for running the test goes here
        }
    }
The QuestionPrompt class will contain 2 fields, 1 constructor, and 1 method named DisplayPrompt(). The following code block displays the QuestionPrompt class.
internal class QuestionPrompt
    {
				// Fields
        private string Answer;
        private string Question;

				// Constructor
        public QuestionPrompt()
        {
					// Constructor code goes here
        }

				// Method
        public void DisplayPrompt()
        {
					// Code to display the prompt goes here
        }
    }
The last class, Examinee, contains only 2 attributes and a constructor.
internal class Examinee
    {
				// Fields
        public string Name;
        public int Score;

				// Constructor
        public Examinee()
        {
            // Code for keeping track of user info goes here
        }
    }
Conclusion
In conclusion, converting a UML Class Diagram into written code involves carefully analyzing the design and translating it into working code. By following the diagram and defining each class and its properties and methods, we can create a fully functional C# program that can be compiled and executed.
I hope this beginner’s guide has been helpful and informative. By following the tips and guidelines outlined here, you’ll be well on your way to mastering UML Class Diagrams and improving your software development skills. Happy programming!


